Using long flat shadow for designing app icons is a popular trend in flat design. These extended drop shadows are characteristically angled at approximately 45 degrees below the horizontal axis, preferably towards the right.
![]()
Many Windows Phone apps including 6snap (shown below) use this design in their app logos.
![]()
In this tutorial I will show how you can create a flat long shadow app icon from scratch using free vector graphics editor, Inkscape.
We will start with creating icon elements: background and basic icon. After this, we will learn to create long shadow. For this, we will first duplicate app icon then use transform and interpolate functions in inkscape. Next we will apply gradient to the shadow and reduce its opacity. Finally we will remove the extra shadow and icon copy by creating a clipping mask. We will finish by learning how to export our image to different-size icons. Let’s begin!
1. Create icon elements
Step 1
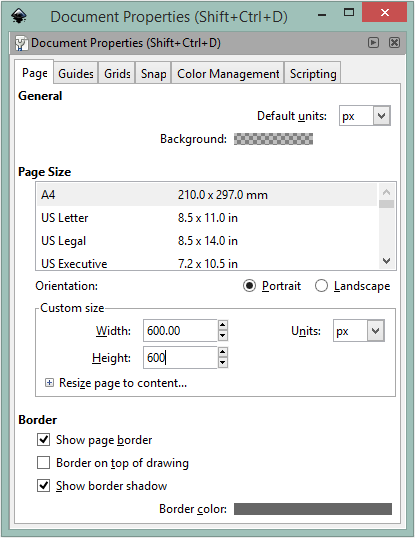
Create a new Inkscape document then go to File -> Document Properties.
Set document size to 600 px square as shown below.
Step 2
Set zoom to 100% or a reasonable value as per your convenience.
Step 3
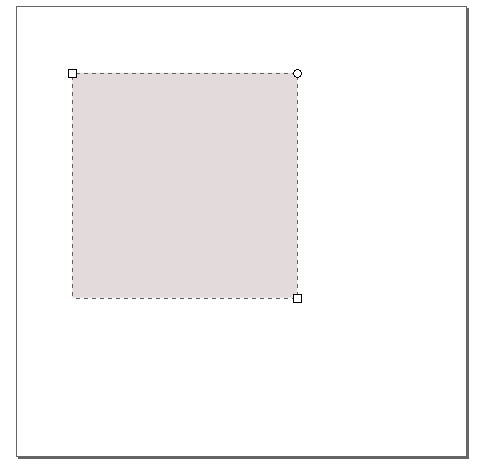
Now we will create a square background for our icon.
For this, grab Rectangle tool (F4) from the toolbox.
Use it to draw a 300 x 300 px square. Hold down the Ctrl key to constrain to a square.
You can use the info bar at the bottom of Inkscape to see the rectangle size while drawing.
Leave some space below and on right side of the background as shown below. It’ll be needed later for creating long shadow.
Step 4
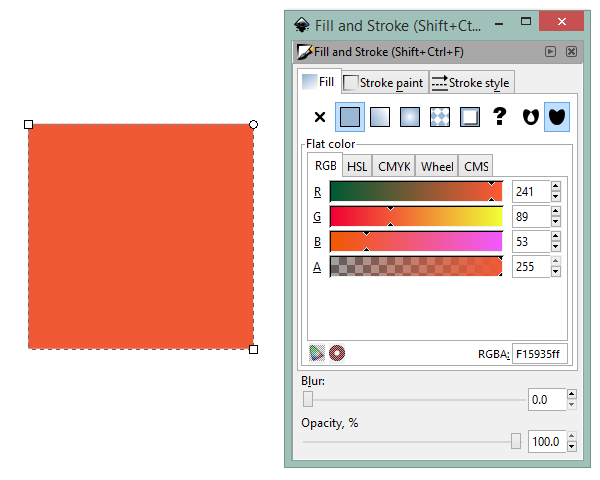
Change the fill color of this square to the color you want for your icon background.
To do this, open Fill and Stroke dialog by going to Object -> Fill and Stroke (Ctrl, Shift and F).
Set RGBA value to the hex value of color that you want. I set it to f15935ff to fill background with reddish-orange color as shown in following image.
Step 5
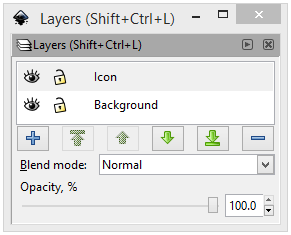
In order to have maximum flexibility later, we will create basic icon on a separate layer.
You can add new layer by going to Layer -> Add Layer (Ctrl, Shift and N). Or you can open Layers dialog from Layer -> Layers menu option (Ctrl, Shift and L) and add a new layer by using ‘+’ button.
Name this layer Icon. For clarity, you can also rename first layer, I have renamed it to Background. You will have two layers in the Layers dialog as shown below.
Step 6
You can draw your icon in inkscape, you can also type in a text but then convert it to a path by going to Path -> Object to Path (Shift+Ctrl+C).
The text or icon can be positioned in the middle of the background with the help of Align and Distribute window (Shift + Strl + A).
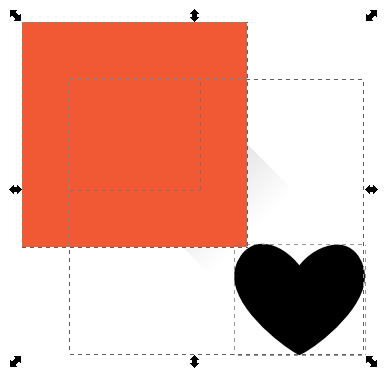
I used text tool (F8) and heart emoji to create my icon as shown below.
I kept the icon fill color as black for creating long shadow that we’ll do next. We will change this color in a later step.
![]()
2. Create long shadow
Step 1
For creating long shadow, first we need to duplicate the heart that we created above.
Duplicate it with Ctrl+D. This will create a copy on the top.
Step 2
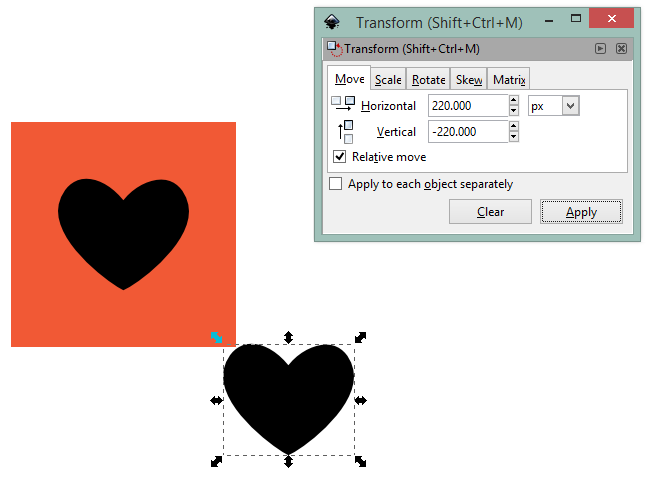
Next our aim is to move the copied item equally on x and – y axes to achieve the characteristic 45o angle for our long shadow.
For this, go to Object -> Transform menu option and open the Transform dialog (Ctrl, Shift and M).
In the Move tab, enter values of 220 for Horizontal and -220 for Vertical, tick Relative move and click Apply to shift the top copy right and down by 220 pixels as shown below.
Step 3
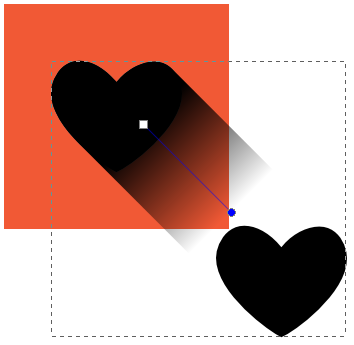
Interpolation is the final step for creating a long shadow.
Pressing Shift key, select both the heart shapes. Then go to Object -> Ungroup (Ctrl, Shift and G) to break the group in two separate paths.
Go to Extensions -> Generate from Path -> Interpolate in menu option and enter following settings:
Exponent: 1
Interpolation steps: 200
Interpolation Method: 1
Uncheck the Duplicate endpaths and Interpolate style checkboxes.
Click Apply when you’re done. This will create a group which consists of 200 copies of our object (heart) as shown below. Specifying high number of interpolation steps keeps the separation between them to a minimum, until it’s no longer visible to the naked eye.

3. Add gradient to shadow
Step 1
Before we apply gradient, first we need to break the group of 200 objects created previously.
For this, select shadow and go to Object -> Ungroup.

Step 2
Next unite them into a single path with Path -> Union (Ctrl and +).
Step 3
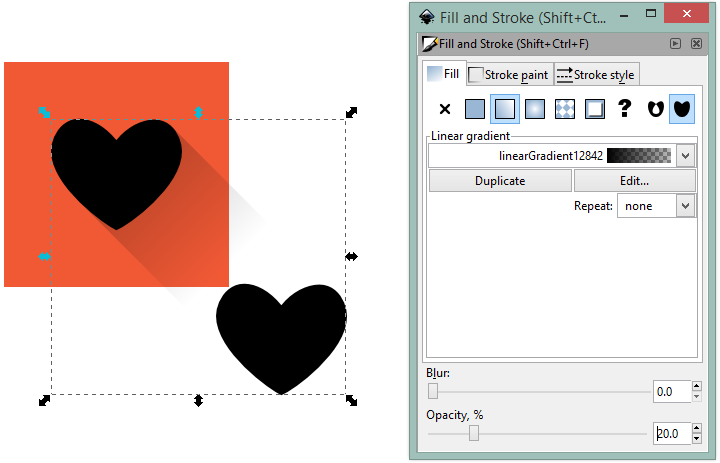
Activate Gradient tool with Ctrl + F1, make sure Create linear gradient is selected then click on the shadow shape.
Click and drag the gradient handle downwards at 45o while holding down the Ctrl key, this will lock the angle to 15o increments and help you in achieving precision in this step.
4. Reduce shadow opacity
Select shadow and reduce its opacity to around 20% from Fill and Stroke dialog as shown below.
You can play around with opacity value to get different effects. Changing shadow fill-color is also an interesting option.
5. Change icon color
Step 1
Select the shadow and send it behind app icon (heart) by using Object -> Lower to Bottom (End).
Step 2
Select app icon (not its copy) and change its fill color to the color you want from Fill and Stroke dialog. I changed it to white as shown below.
6. Remove extra shadow and icon copy
Step 1
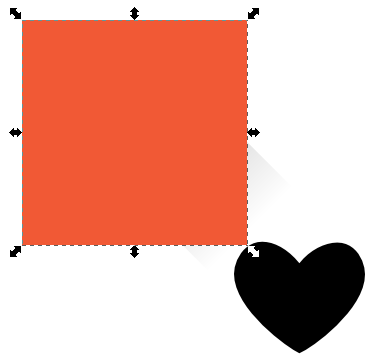
We need to remove the shadow extending beyond the square icon background and also delete the icon copy. For this, we will make a clipping mask from the square background.
Select the square background. Duplicate it with Ctrl + D.
Go to Layer -> Move Selection To Layer Above (Shift + PageUp), this will move the square copy to icon layer.
Use Object -> Raise to Top (Home) menu option to place it on top of all items in icon layer as shown below.
Step 2
Lock the background layer.
Now select all the objects on icon layer with Ctrl + A as shown in following image.
Step 3
Go to Object -> Clip -> Set. This will clip all the selected objects to the border of the topmost one.
Below is what our final clipped image looks like.

7. Export your app icon
First of all, save the image as .svg file for future use, this image format can be scaled up or scaled down without any loss in quality.
Now, go to File -> Export Bitmap and export your drawing as a 300 x 300 px icon as shown below.
You can change the height and width of bitmap as indicated in following image to save different-size icons according to the requirement.
![]()
Please share
I hope that you enjoyed the tutorial and will refer to it when creating flat long shadow icon for your app. Please do not forget to share it with others.
Thank you for the detailed steps.
Very well explained, managed to create nice icons.
Thanks! Glad that you liked it.
Awesome tutorial!
You could also use the Extrude Extension (Generate from Path > Extrude) on the polygon setting to do the same thing as the interpolate step. (this will give you a “real” straight line rather than one just straight to the eye)
“I used text tool (F8) and heart emoji to create my icon as shown below.” How to add heart emoji ?
Copy one from here: http://getemoji.com/
Finally, something that makes sense!
That was awesome!
Great Tutorial! The edges of the interpolated shape, can be smoothed by using the Path -> Simplify tool if neccesary.
What is use of “motion” , extension-> generate from path->motion ?