Sunburst backgrounds (as seen in image below) are often used in designing different elements of apps and games like their icons, splash screens or UI elements like buttons and dialog boxes.

Endless runner game Angry Gran Run uses sunburst background in the game icon as well as dialog boxes within the game. I also used a sunburst background for creating icons for my cross-platform game Spooky Planet.

In this tutorial, I will show how you can create sunburst background on your own with the help of distortion filters in Adobe Photoshop.
We will start with choosing the colors for our sunburst background. Next, we will use these colors and apply a linear gradient. Then we will learn how to use Photoshop filter, Wave to create vertical stripes from the gradient we applied. And finally we will see how to use another Photoshop filter, Polar Coordinates to create our sunburst effect from the stripes. I have also included a video tutorial so that you can see all these steps in action. Let’s begin then!
1. Create a New Project
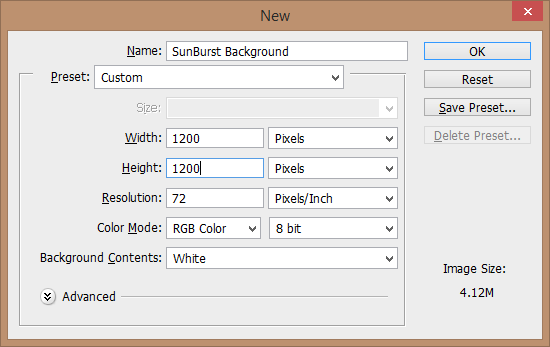
Create a new blank document in Photoshop. I created a 1200×1200 px document as shown below, you can start with the size you want.
2. Select Colors & Apply Gradient
Step 1
Next, select Gradient Tool (G) from the toolbar.
Then set the foreground and background colors for the gradient from color picker tool. Select the colors that you want for your sunburst background. If you need inspiration, you can check out these color palette generators.
In my case, I used following colors (RGB values):
Foreground color – 428C9C
Background color – 1C4B61
Step 2
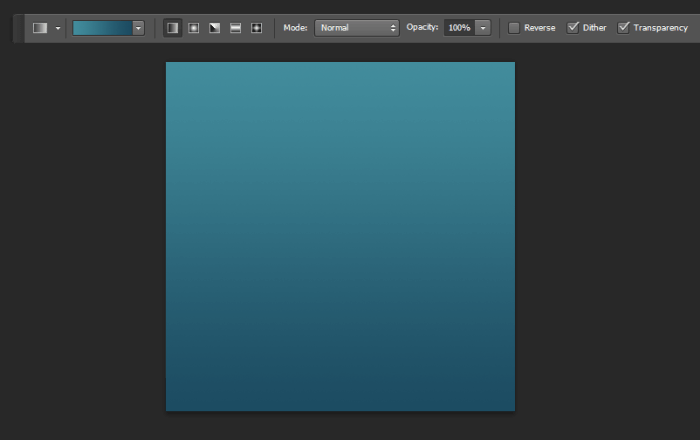
Make sure Linear Gradient is selected, draw a downward vertical gradient on your document.
Tip: Press Shift while drawing the gradient to achieve precision in this step.
Below you can see the settings of gradient tool and our document after applying the gradient:
3. Create Stripes
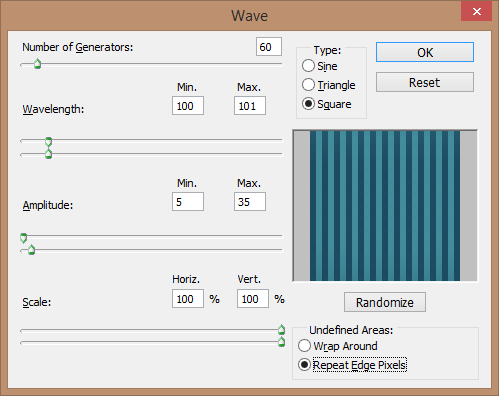
For creating stripes, go to menu Filter -> Distort -> Wave. This filter creates a sine, triangle or square wavy pattern depending on the settings you use.
Below are the settings that I used, you can play around with these values to see the distortions that are possible with Wave filter.
4. Create Sunburst Effect
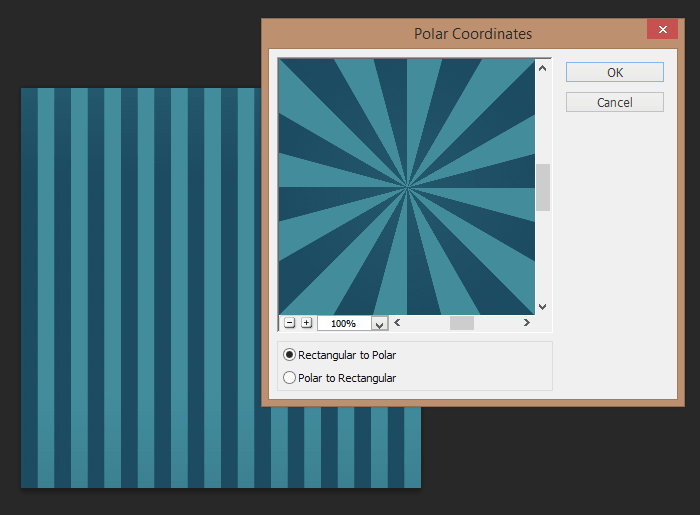
In our final step, we will create a sunburst effect from the stripes that we made in previous step. For this, go to menu option Filter -> Distort -> Polar Coordinates. The Polar Coordinates filter converts a selection from its rectangular to polar coordinates, and vice versa, according to the selected option.
In our case, select Rectangular to Polar as shown below and we are done!
Final Image
Below is what our sunburst background looks like:

Video tutorial: Create Sunburst Background in Photoshop
To see all the above steps in action, you can see the following video tutorial.
I hope you enjoyed the tutorial and will refer to it when in need of creating your own sunburst backgrounds. You can play with colors to create beautiful sunburst backgrounds. You can also use textures like grungy paper or metal textures and add them as an overlay over your sunburst background in Photoshop to make your own vintage, grungy style sunburst backgrounds.

Thanks this was a useful tutorial!
Thank you very much for the tutorial and I have a doubt, Why always using the resolution to 72 and what will happen if we go on higher resolution ie.300. Because most of the tutorials like this or creating wallpaper, buttons etc… the default value setting is 72. pls reply
Great tutorial – thanks !!
what an easy tutorial, thank you.