In this post, I will share how I enabled HTTPS for my WordPress based blogs including Super Dev Resources without purchasing any SSL certificates. This was done mainly with the help of CloudFlare and a bunch of WordPress plugins.
Read on to learn how you can enable HTTPS for your own WordPress website using the method presented in this article.
Why HTTPS is important?
Apart from the obvious security benefit for the users of your websites, HTTPS also provides better ranking signals to Google.
Google has made it clear that HTTPS is a ranking factor for its search result and has started indexing HTTPS pages by default. Google’s Gary Illyes has said that while only 10% of the crawled and discovered URLs on the web are HTTPS URLs, 30% of the first page search results contain at least one or more HTTPS URLs.
Therefore it makes sense to switch to HTTPS if you can.
Before you setup HTTPS using this method
While you can enable HTTPS on your WordPress website without purchasing a SSL certificate by following the instructions given below, I would recommend this to only those websites which are usual blogs or other simple websites (landing pages etc.). If you have an e-commerce website or a website which require personal details from users (like username, password, credit card info etc), you should definitely look into purchasing and setting up a SSL certificate for your domain.
Also note that you can get a SSL certificate for free from LetsEncrypt
How to setup HTTPS in WordPress without Certificate
1. Move your website behind CloudFlare
CloudFlare offers an excellent free CDN and a lot of added benefits apart from offering a free way of enabling HTTPS and HTTP/2 on your website. Sign-up for CloudFlare and follow their instructions to move your website’s nameserver to point to CloudFlare.
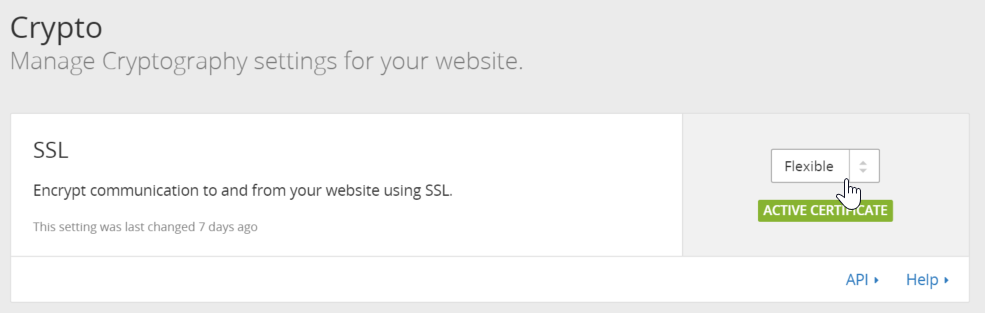
2. Enable Felixble SSL in CloudFlare
Once your website is setup with CloudFlare, visit the Crypto tab in your CloudFlare dashboard and choose the “Flexible” option in SSL section. You don’t need to change any other settings in Crypto tab.
3. Install CloudFlare Flexible SSL for WordPress
CloudFlare works as a reverse proxy for your site and fetches your website over regular HTTP request even when serving HTTPS pages to your visitors. We need to detect such kind of request and make WordPress output pages for a HTTPS request.
Thankfully, you don’t have to do this manually and we have a WordPress plugin for doing this job. Just install the CloudFlare Flexible SSL for WordPress and we should be able to visit our website over HTTPS.
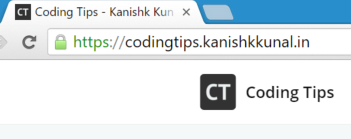
This plugin doesn’t require any additional settings and you should be able to see a lock icon in your address bar when you visit your website over HTTPS.
4. Fix Mixed Content Warnings
Sometimes a plugin or a theme is not properly coded and may not behave nicely when you try to visit your website over HTTPS. If this happens, then you will get mixed content warnings in your browser’s console and will not be able to see a a lock icon in your address bar. This is not a good scenario and you should definitely try to resolve it by switching to better coded WordPress themes and plugins.
However if that is not working out, you can install another WordPress plugin which will be able to resolve the mixed content warnings in your WordPress website.
Install SSL Insecure Content Fixer on your WordPress website and configure it as follows.
Choose “Simple” or “Content” for Fix insecure content

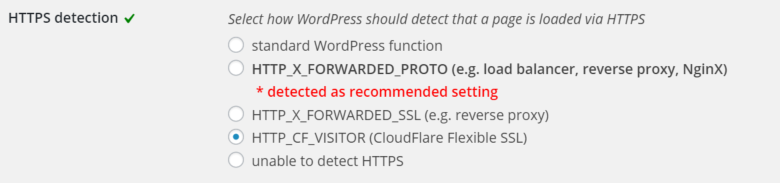
Choose “HTTP_CF_VISITOR” for HTTPS detection. You can choose HTTP_X_FORWARDED_PROTO too as recommended by the plugin as both the headers are set when using CloufFlare HTTPS.
SSL Insecure Content Fixer also allows you to fix specific plugins (e.g. WooCommerce) on your WordPress site for HTTPS. You can choose to enable them if needed.
Once above is done, you should be able to see lock icon in your address bar and the mixed content warnings should be gone.
5. Divert all traffic over HTTPS
Make sure to verify every page on your website over HTTPS before performing this step. Once you have verified that your website content is being served properly over HTTPS, you can move your entire domain to be served using HTTPS only. To do this we will make use of CloudFlare’s page rules.
Go to the Page Rules tab of your domain in the CloudFlare dashboard and add the following rule.
URL Pattern: http://*yourdomain.com/*
Always use https: On
Don’t forget to change yourdomain.com with your website’s domain.
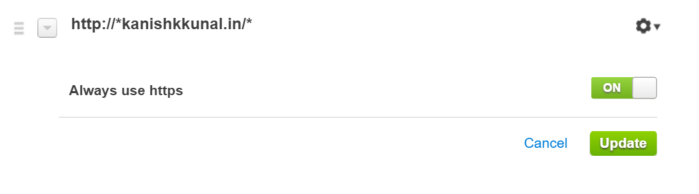
Save the page rule. After this step, whenever you visit your website, you will get redirected to the HTTPS version.