For quite a while, I have been running a WordPress multisite installation mapped to different domains. But recently, the use of WordPress multisite for my websites proved to be more of a hassle than a help and I decided to move some of my sites into single WordPress installations. In this post I will outline the broad level steps I took to accomplish this move from a multisite to single installation of WordPress with zero downtime.
As there are variety of variations for hosting and configuring WordPress, no one article can cover all the scenarios in detail. Therefore I have purposefully kept this article short and concise, addressing only the broader level steps needed to make this move from WordPress multisite to single site.
Step 1: Prepare your target WordPress installation for single site
The first and the obvious thing is to prepare a fresh new installation of WordPress which is configured to serve a single site.
Since moving from a WordPress multisite to single site is not trivial, you cannot just copy and paste your WordPress installation folder (or wp-content folder) to the new location and import-export database. We will do a plain vanilla installation of a single site WordPress on the target machine and do an import from multi-site later.
You can choose a completely new database name here as it is not going to affect our import later. I would recommend the following tutorial and system configuration suggested by Digital Ocean for setting up a new WordPress installation:
How To Install WordPress with Nginx on Ubuntu 14.04
Sign up for Digital Ocean using the link below and get $10 in free credits for your new server powered with SSD
Step 2: Complete WordPress Installation on target server
You should complete the WordPress installation on your new server by visiting the IP address of your remote server in browser. By doing so we will be able to setup WordPress on our server while still being able to access our old WordPress installation at original domain.
http://your_server_ip
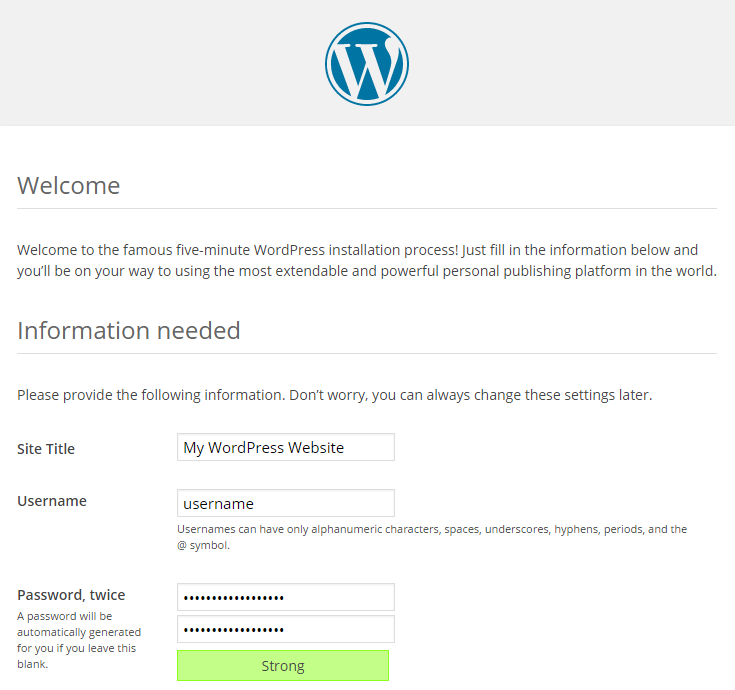
Go ahead and fill up site title, username and other details. Make sure to keep them same as your old WordPress site. You may change the password but keeping the same username is recommened. Don’t use ‘admin’ as username.
Once the setup is complete, log into your WordPress admin area of your new installation and delete the sample posts and pages that WordPress adds by default. Also change the permalink structure to match the permalink structure of your old WordPress installation.
Step 3: Install Themes and Plugins on target WordPress setup
Now that we have WordPress installed and configured (by default) to serve only a single site on our target server, we need to bring over all the themes and plugins we had in our previous installation.
Depending on the number of plugins and themes you may have, you can choose to do this step by installing each plugin and theme fresh on the new setup or by simply copying the wp-content/themes and wp-content/plugins directories from your old multisite installation to new single site WordPress installation folder.
Step 4: Export your site data from multisite WordPress installation
After installing the necessary plugins and themes, next we need to export our posts, pages, comments, menus and other WordPress data from our previous installation. To do this, go to the admin area of your site in your multisite setup and find Tools->Export in the admin menus towards the left. You should be presented with the following screen.
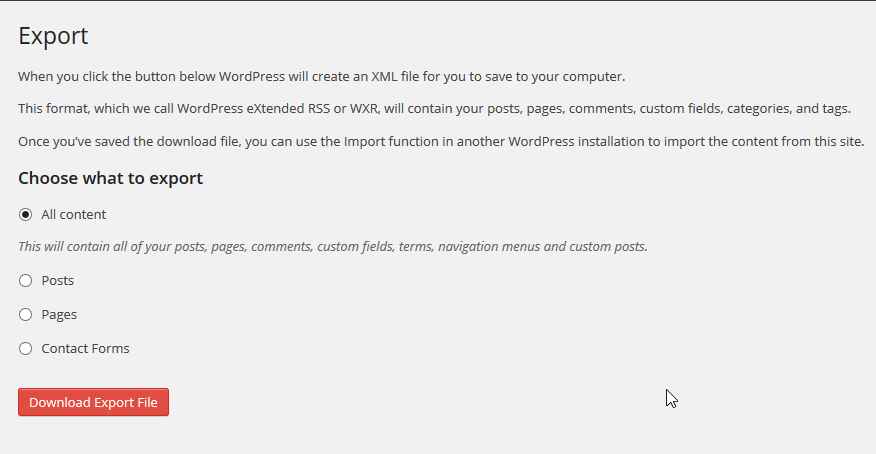
Make sure to select “All content” from the options and hit on “Download Export File”. Save the exported XML file at a convenient location.
Step 5: Import your site data in target WordPress installation
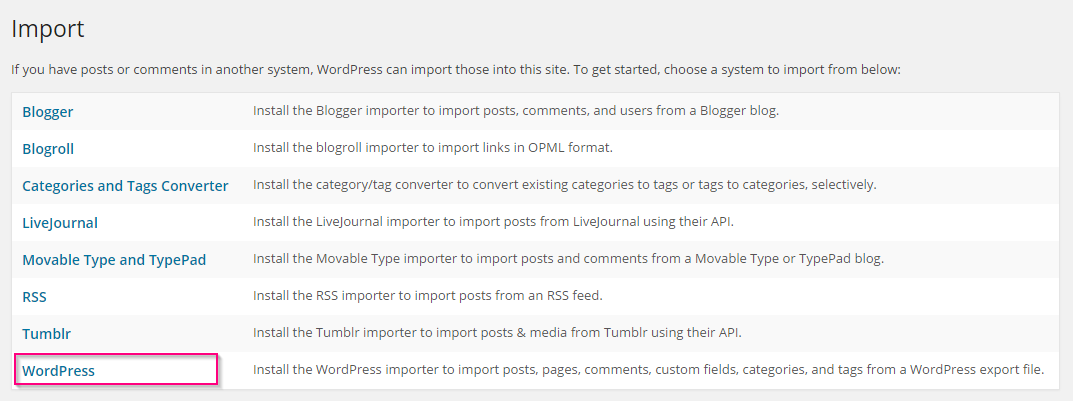
Go back to your new WordPress setup and install the WordPress import module by going to Tools->Import and selecting the WordPress option from the list as shown in screenclip below.
Once WordPress Importer is installed choose Activate Plugin & Run Importer to begin importing. Choose the location of the XML file that we exported in the previous step and hit Upload file and import.
Once the upload is complete, WordPress will ask you to assign authors and configure whether to download and import file attachments or not. Select and map your default author and import any additional authors you may have on the blog. Also make sure to select the option to download and import file attachments. WordPress will begin the import and will also download images and other media from your old server once you hit on Submit. This may take a while depending on the number of posts.
Once this step is done, go and verify that your posts, pages, comments, menus, media library and other WordPress data have been imported successfully in your new setup.
Step 6: Configure Widgets, Theme Options and plugins
A downside of doing the WordPress inbuilt export & import is that Widgets, theme options and plugins settings are not imported automatically. And therefore we need to configure them back all over again.
You can do this by recreating the widgets in sidebar and manually copying your theme options and plugin settings from your previous installation. Some of the plugins also provide an in-built export and import settings so do make use of them to make things faster.
You may want to use this opportunity to evaluate the plugins installed with your WordPress setup and uninstall all those that are not needed anymore.
Make sure to check all other WordPress settings such as Reading, Writing etc to match the previous installation. Also configure your imported menus at desired location.
Step 7: Switch domain records
Before doing this step, make sure that your new WordPress setup looks alright. If everything is fine then go ahead and update the WordPress Address (URL) and Site Address (URL) by going to Settings->General to point to your domain. Once you save this, WordPress will refresh and try to open at your new domain. You must now point your DNS records to the new server.
Go ahead and update the DNS records for your domain to point to the IP address of the new server. The changes in DNS records may take some time. Once they are live you would be able to access your site via the domain name instead of ip address.
Note that now we no longer have access to our previous WordPress installation via the domain name, however if you want, you can configure a temporary subdomain to access it for sometime before deleting.
Summary
WordPress multisite installation is great in administering multiple WordPress sites in single installation. However, over time as individual sites grow, you may have the need to move out some of the sites onto separate server in an individual WordPress installation. In this post we saw how we can achieve this task by manually exporting and importing data of a site from a multisite WordPress installation to another new WordPress setup.
Note that there also exist utilities like WP-CLI that can be used to automate some of the process mentioned above.
One little helpful trick: get acquainted with your hosts file.
(This is much easier if you can put two computers side by side.) As you mentioned in your guide, you can connect to your WordPress site by directly specifying the server’s IP address. When you type a domain name, a nameserver directs you to the proper IP address. The hosts file on your computer allows for overriding this behavior.
So, while one computer is being used to connect to the old server (using the domain name), the other can be used to connect to the new hosting server. The hosts file on the computer for the new server just needs to have a line inserted showing the new IP address and associated domain name. When the work is done, just remove that line from the hosts file. :-)
Thanks for your comment Tony! Locally mapping IP with domain name in hosts file is surely a good way to work with a new server until the DNS records are changed.
Hello,
I tried it on my localhost, the images are not displaying.
Plz reply.
Thanks
Hi Bhanu, if you need help you would need to provide more details than just saying that images are not displaying. Here are a few questions you can answer in order to provide more details and in order for me to help you with your problem.
1. How are you setting up WordPress and on which environment?
2. Did you follow each step exactly how I have instructed or did you have to do workaround somewhere?
3. Was the site you were importing from still live on it’s original domain when you did the import?
4. Did you check the option to “download and import file attachments” while importing as I instructed in my post?
hi! does this work if woocommerce is installed on the wordpress as well? Will the orders and customers details (that were previously on the multisite) be transferred over to the new single site?
Great article by the way!
Hi Ming,
To be honest, I have never tried this method with WooCommerce installed, so I won’t be able to comment on it.